This coffee table was almost 20 years old and has put it's time in well in our family. It was finally time to re-do the family room after the dog somehow managed to get a piece of the 12 foot drapes that hang on either side of the fireplace. His crate sits in a corner and him being a puppy and probably bored at some point decided my 25$/yard curtains looked like something he might enjoy chewing, so he managed to work them into his bed and ripped and chewed away. They then became this...
...and some pillows...see below.
Long story short, we needed a new couch desperately...the one we had was 14 years old. It had been through 2 teenagers and 2 babies who were almost teenagers and it just needed to go. So the whole room needed a re-do with one exception. I could not afford to change the paint color, which is a beautiful shade of Granny Smith Apple Green. It's a 2 story room which I cannot possibly paint myself (and I hate to pay for things I can do myself) and the color is still 'in', so I wanted fabric that would contrast. It matches the new couch, the old curtains (which are now the crate cover) and the walls and the black accent theme in the room.
I looked at a lot of DIY you tube videos on upholstery and table to ottoman make-overs and still had several things to ponder, which I would do @ 3 and 4 in the morning when my husband's snoring would wake me up. I started by spray painting the bottom black...
Then I knew I wanted a 'tufted' look, so I drilled holes in the wood, which I measured, starting with a hole in the center...luckily it had 'inlaid' wood already, which helped with the placement.
The foam was tricky...I wanted thick foam to make the tufting more opulent. Now here's the shocker. When I went to JoAnn Fabrics for said foam, it was going to cost me $120!! $89/yard...when did this happen? I recovered a love seat around 1999 and I know that foam was not this price. So, I went home and looked at the foam on said love seat and it was 4 inches thick...perfect, but not wide enough, so I used that and bought 2 precut pieces @ $14 each (on sale for half price) and glued them together with Elmers and Tacky Glue...
I cut the excess with an electric knife, which is perfect. Next I used my template to make and cut holes in the foam in sort of a V-shape, to make the tufting look better (one of the tricks I found on the You Tube videos)...
Next I covered the whole thing with polyester batting...I bought the mid-grade, but might have preferred the cotton hi-grade.
I put a couple of staples on each side to hold it steady while I attempted to do the tuftinig. The tufting was by far the hardest part and I really don't know how I could have done it any easier...a much longer needle would have helped, but of the three stores I went to (JoAnns, Hancocks and WalMart) 3.5 inches was all I could find.
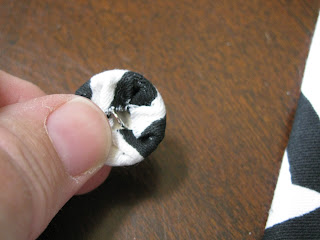
Here are my covered buttons...when did the price of these go up too?? DIY is not as cheap as it used to be! A word on the covered buttons. I did not buy the upholstry grade button as I was really trying to keep the cost down, in case it didn't work! But I did buy the one that has the 'hook' attached to the button it's self and not the hook attached to the cover. I've read about buttons 'popping' and assumed this would elimate the button and the back coming apart. I needed 13 buttons to cover and of course, they only come in packs of 4!!
I looped a string of cooking twine through the button leaving at least 8 or 9 inches...
Next I threaded it through said needle and in the center started poking...and poking...and poking. Finally I sort of eased the foam away from the table and once the needle came through the foam, I could see it and guide it to the hole.
After I had them all through, I pulled and pushed, and tied them to a screw (only thing I could find that I had 13 of...)
Next I used a staple gun and pulled the fabric taut and stapeling.
I trimmed the excess (not right up to the fabric as I didn't want it to 'ravel' and come loose)
I hot glued a piece of trim around the edges. I should have started with the trim in the middle or somewhere other than the edge, as I think it could have looked better. Oh, well.
I put my legs back on and viola...my new ottoman!


No comments:
Post a Comment